

How To Change Tray 1 To Tray 2 In Hp Laser Jet 600 Printer
Z7_3054ICK0KGTE30AQO5O3KA30N0
HP LaserJet Enterprise 600 M601, M602, and M603 Serial Printer - Load paper trays
Load Tray ane
note:The product might print at a slower speed when using Tray 1.
circumspection:To avert jams, do not load trays while the product is printing. Do not fan the paper. Fanning can crusade misfeeds.
-
Open Tray ane.
Figure : Location of Tray 1

-
Pull out the tray extension.
Figure : Location of extension
-
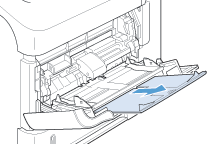
Load the newspaper into the tray. Make sure that the newspaper fits under the tabs and below the maximum-elevation indicators.
Effigy : Load paper

-
Adjust the side guides then that they lightly touch the paper stack but practise not bend the paper.
Effigy : Location of side guides

Load Tray 2 or an optional 500-sheet tray
circumspection:To avoid jams, do non load trays while the product is printing.
caution:Do not fan the paper. Fanning tin can crusade misfeeds.
-
Pull the tray out and lift upwardly slightly to remove it from the production.
Figure : Location of the tray

-
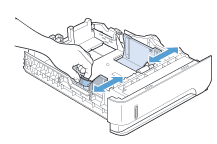
Compression the release lever that is located on the left guide and slide the side guides to the correct paper size.
Effigy : Location of the side guide
-
Pinch the release lever that is located on the rear paper guide and slide it to the right paper size.
Figure : Location of the rear guide release

-
Load the newspaper into the tray. Brand sure that the stack is flat at all four corners and that the top of the stack is beneath the maximum-height indicators.
Effigy : Location of maximum-top indicators

-
Slide the tray completely into the product.
Figure : Reinstall the tray

Load an optional 1,500-sheet tray
The optional 1,500 sail tray adjusts for Letter, A4, and Legal sizes. The product automatically senses which size is loaded if the tray guides are correctly adjusted.
caution:To avert jams, do not load trays while the product is press.
caution:Do not fan the paper. Fanning tin cause misfeeds.
-
Printing the release and open the door of the i,500-canvas tray.
Effigy : Location of 1,500-sheet tray

-
If newspaper is in the tray, remove it. When paper is in the tray, the guides cannot be adjusted.
Figure : one,500-sheet tray with newspaper

-
Compression the guides at the front of the tray and slide them to the correct paper size.
Figure : Location of guides

-
Load the paper into the tray. Load complete reams at one time. Exercise not divide reams into smaller sections.
Figure : i,500-sheet tray with newspaper

-
Make certain that the height of the stack does not exceed the maximum-height indicators on the guides and that the front edge of the stack is aligned with the arrows.
Figure : Location of maximum-height indicators

-
Close the door on the tray.
Figure : Location of tray door

Paper orientation for loading trays
Load letterhead, preprinted, or prepunched newspaper
If a duplexer is installed, or if a stapler/stacker is installed, the product alters the style the images for each page are bundled. If you are using newspaper that requires a specific orientation, load information technology co-ordinate to the information in the following table.
| Tray | Single-sided printing, no stapler/stacker | Duplex printing, no stapler/stacker | Unmarried-sided printing with the stapler/stacker | Duplex printing with the stapler/stacker |
| Tray 1 | Confront-up Pinnacle border leading into the product Figure : Paper orientation | Face-down Bottom border leading into the production Figure : Paper orientation | Face-up Bottom edge leading into the product Figure : Newspaper orientation | Face up-down Summit border leading into the product Figure : Paper orientation |
| All other trays | Confront-down Top edge at the front of the tray Figure : Newspaper orientation | Confront-upwardly Bottom edge at the front of the tray Figure : Paper orientation | Face-down Bottom edge at the front of the tray Figure : Paper orientation | Face-up Superlative border at the front of the tray Figure : Paper orientation |


Load envelopes
Load envelopes into Tray 1 or the optional envelope feeder with the front of the envelope facing up, and the short, postage-edge leading into the product.
Figure : Envelope orientation


Source: https://support.hp.com/id-en/document/c03020787
Posted by: arnoldbutile.blogspot.com
0 Response to "How To Change Tray 1 To Tray 2 In Hp Laser Jet 600 Printer"
Post a Comment